Using cookiecutter hooks to enhance code scaffolding
Using cookiecutter to scaffold code repositories offers useful way kick start projects. To enhance the user experience even more, this post will look at using hooks to perform actions such as input validation and clean up activities.
Hooks
Purpose of hooks
Within software, hooks are a way of augmenting an application’s capability by allowing the injection of additional or customisable content.
Using hooks in cookiecutter allows us to do the following and more:
- Display user friendly messages
- Add input validation
- Remove unwanted files/folders
- Implement complex logic
- Initialise a git repository
Setting up cookiecutter hooks
The previous post that introduced cookiecutter, also outlined the process flow over 5 steps as shown in the following diagram.
Once we’ve prompted for and gathered user input, the hooks, if any exist, are then applied.
The process to set up hooks in cookiecutter is straightforward and is described below:
- Determine which type of hooks to run
- Determine whether to use python or shell scripting.
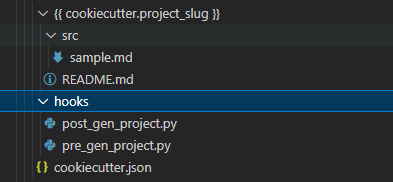
- Create a folder named
hooksat the root level of the cookiecutter project. - For python hooks
- Create a file named
pre_gen_project.pyfor running pre-generation hooks. - Create a file named
post_gen_project.pyfor running post-generation hooks.
- For shell scripts, the process is the same as step 4, except the file type changes e.g.,
.sh.
For an example of what this would look like in VSCode, see the following image.

We’ll expand on the basic cookiecutter template we used in the previous post to demonstrate how we implement hooks in cookiecutter.
Pre-hooks
Pre generation hooks are great for cases where we need to perform actions before we scaffold our repo. The following steps will walk through basic validation using a pre-generation hook.
Create a basic pre-generation hook
- Complete the steps in “create a basic cookiecutter template”
- Create a folder named
hooksat the root level of the cookiecutter project - In the hooks folder, create a
pre_gen_project.pyfile and add the following code block
  import sys

  print("********** PRE GENERATION HOOK *************")

  def main():
      validate()

  def validate():
      created_by = '{{ cookiecutter.created_by}}'

      if not created_by.strip():
          print("ERROR: You failed to specify 'created by'.")
          return 1

      return 0

  if __name__ == '__main__':
      sys.exit(main())
- In the parent directory of the cookiecutter template, run
cookiecutter cookiecutter-data-app --output-dir "<insert-output-directory>" - Give inputs for “project_name” and “project_slug”
- Do not add input for “created_by” and hit enter
- This should throw a validation error similar to the below

And with these steps, we have now been able to introduce validation via pre-hook execution! 😄
Post-hooks
As previously mentioned, post generation hooks can give a great user experience by providing helpful text on project creation or implement complex logic post_gen_project.py
The following steps will walk through using a post-generation hook, where based on user input, the code scaffold a repo with either the local, aws or azure content.
Create a post-generation hook
- Remove the
pre_gen_project.pyfile from thehooksdirectory, for now. We’ll use it later when do a complete run - In the same hooks folder, create a
post_gen_project.pyfile and add the following code block.
  import sys, os, shutil

  def main():
      environment = "{{ cookiecutter.environment }}".lower()
      print("********** POST GENERATION HOOK *************")
      get_environment(environment)

  def drop_dir(dir_list):
      for dir in dir_list:
          cur_dir = os.path.abspath(os.path.curdir)
          drop_dir = os.path.join(cur_dir, dir)
          if os.path.exists(drop_dir):
              shutil.rmtree(drop_dir)
          else:
              print(f"Error: The directory '{drop_dir}' could not be removed")

  def get_environment(environment):

      env_list = []
      if environment == "local":
          env_list = ["aws", "azure"]
      if environment == "aws":
          env_list = ["local", "azure"]
      if environment == "azure":
          env_list = ["local", "aws"]

      drop_dir(env_list)

  if __name__ == '__main__':
      sys.exit(main())
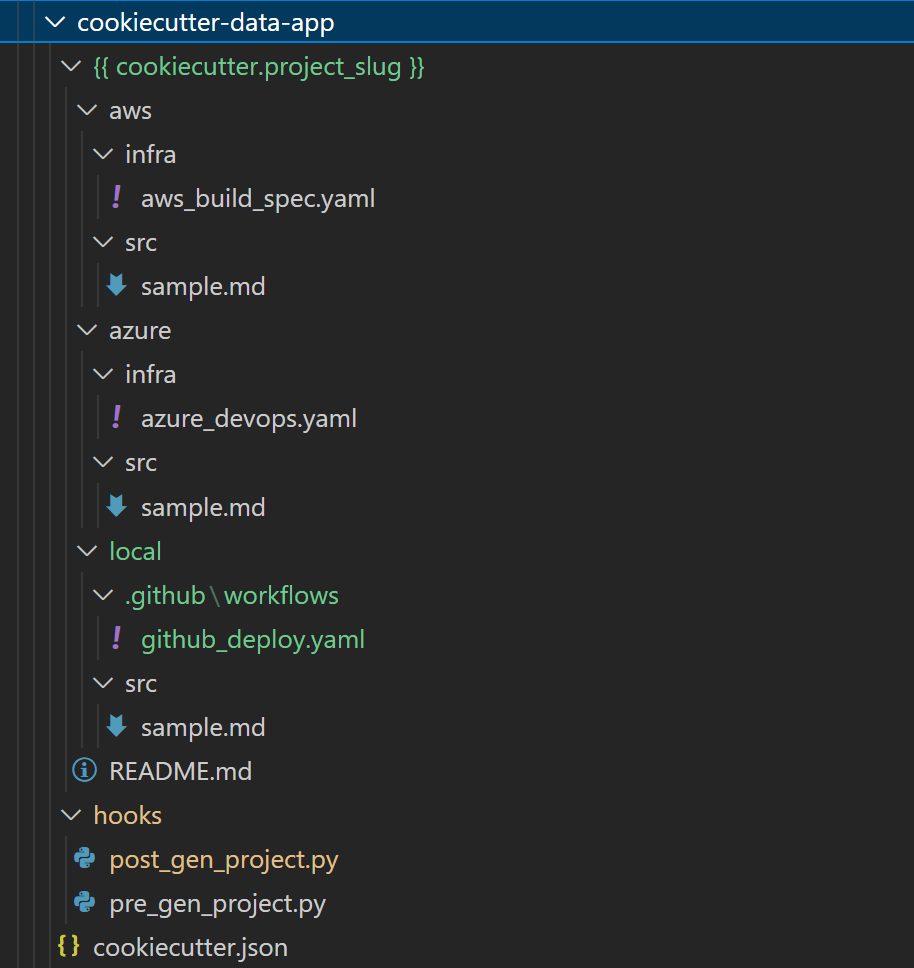
- Create a set of directories named “local”, “aws” and “azure”. Add files and folders similar to the following:

- In the
cookiecutter.jsonfile, add an additional line for “environment” so that it looks as follows:
{
    "project_name": "Starter data project",
    "project_slug": "{{ cookiecutter.project_name.lower().strip().replace(' project', '').replace(' ', '_').replace(':', '_').replace('-', '_').replace('!', '_')}}",
    "created_by": "",
    "environment": ["Local", "AWS", "Azure"]
}
- In the parent directory of the cookiecutter template, run
cookiecutter cookiecutter-data-app --output-dir "<insert-output-directory>" - Give inputs for “project_name”, “project_slug” and “created_by”
- Enter a choice of “local”, “aws” or “azure” as an option for the environment
- This should return a new template with only 1 environment, similar to the below (e.g., using “local”)


And with these steps, we now have a post-gen hook implemented!
Putting it all together
- Clear the directory where the template was output i.e.
<insert-output-directory>" - In the parent directory of the cookiecutter template, run
cookiecutter cookiecutter-data-app --output-dir "<insert-output-directory>" - Make sure both the pre and post generation hooks are in the
hooksfolder - With both pre and post generation hooks in place, you should observe a complete run with validation and a chosen environment
Considerations
Shell or Python
When using hooks, the choice of using shell scripts or Python is an important one to make based on factors such as portability and experience. Running a .bat file or other shell script can provide a head-start but the implementation may fall short if this needs to be run on other platforms.
Typically in such cases where portability is important, Python lends itself to be a better option but shell scripts can also be a quick and easy way to implement hooks.
Security
With the ability to implement additional functionality via hooks comes the ability to inject malicious code. 😐 If running hooks in particular is a concern, there is the option to run without hooks by setting the parameter accept_hooks to false. This will prevent hooks from running but be warned that malicious code can be placed elsewhere such as in jinja templates.
Running hooks is of course not unique to cookiecutter and as always, follow good security practices when developing any application.
Closing thoughts
Hooks are a great way to extend the functionality cookiecutter can give the code repo scaffolding process. As ever in software or data engineering, if you are to use hooks, follow good practices such as exiting the program appropriately and error handling for a robust implementation and better user experience.
Thanks for reading!